Artbreeder is one of those amazing websites that has the potential for truly wonderful things (portraits, landscapes, anime, buildings, paintings, etc.). Or… images that seethe with existential horror.
And depending on your needs, either of those could be perfect.
The latter seems easier to make by accident, so today, I’ll be covering the nicer looking images.
So, let’s start at the beginning.
Artbreeder is basically a place for people to smash pictures together, edit the individual components (aka genes), or use their “Children” feature to get similar pictures, all with a few clicks.
Copyrights for the images created on the site belong to the individual user, since the user created those images through a series of personal creative choices, though they’re also public domain. (Here’s the official terms and services. Don’t worry, it’s surprisingly concise at a mere 4 pages with reasonably-sized text.)
I use it primarily for headshots for my book characters (which is what I’ll be doing in this little tutorial of sorts), though the basics apply across the site.

As you can see above, the things you see on this site will run the gamut. That’s just the main screen when I visited, and it will likely be different when you visit.
Now, up at the top of that image, there are two choices. Images and Genes. You can click either one, or at the top right of the screen (not in the picture) there are the options to Create or Browse.
I usually sift through images to find a hairstyle close to what I want. (There are more options for tweaking facial features than for hairstyles.)
Today, I’ll be making Jake, one of the characters from my NaNoWriMo Project (The Monsters that H(a)unt Us), as I walk you through this.
So, go ahead and pick a character and find a picture that gets close, even if only in the hairstyle. Or if you’d like to just wing it for this first experiment, pick a random image that you like and maybe this will inspire a story about the person you create.
Jake tends to sweep his sandy hair to one side, so here’s the image I’m starting with:

Below are options that other people have made from that image. Off to the right are the options Edit-Genes, Children, or Cross-Breed. I’m going to start off with the Children option, as shown in the picture.
The site’s Morphogen algorithm makes new randomized versions of that image for you, and gives you an automatic separation from the original image. You have a little bar below the three auto-generated options to select how similar you want the children to be to the parent.
But if you like one of the kids, you should click it. Once you hit the little refresh button (right below the bar for similar/different), the kids that were on screen disappear. If you click them, they appear in your profile under images you created.
So, I chose my favorite child, as seen here:

But he still wasn’t quite right for dear old Jake. So, I clicked on Crossbreed, clicked search, and typed in blond (I left the ‘e’ off because he’s a he, and the ‘e’ is typically for women, and I wasn’t sure if that would matter).

With this lovely picture to smash together with the favorite child, I actually got something I like right off the bat (the far left). But there are slider-bars beneath the two images on the right to choose which image you want the new one to take after (face structure and art style).
Since I’m pretty happy with my turnout, I’m going to move to Edit-Genes, but you feel free to move those little slider bars to your heart’s content. Just be sure to click Save (below the slider bars) if you like the image on the left (so it doesn’t disappear). Once saved, it’ll show up at the bottom, as well as on your profile under “Created” so you can come back to it later.
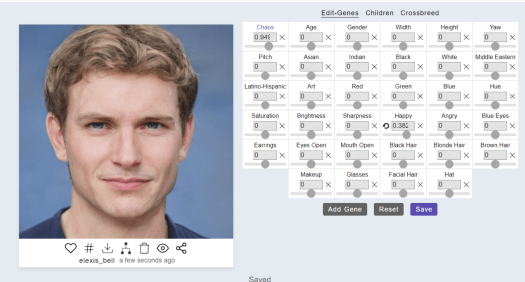
Now, I’ve saved and clicked my new image, and I’m ready to edit some genes. This is where the finesse comes in (or the existential horror).

As you can see, there are a lot of options.
Gene Explanations:
I haven’t quite figured out the Chaos gene, which makes sense. Chaos is, well, chaos. It doesn’t make much sense to me.
But other genes available to edit are a little more intuitive. Age and Gender do exactly as they say. Width makes for a wider or narrower face, where Height lengthens or shortens their head. Yaw adjust whether they’re turned one direction or the other. Pitch is whether they’re tipping their head back or down.
Then, there are the various race options. These adjust bone structure, hair color/type, skin tone, eye color, etc.
Art affects the realism of the image. Less means it looks more like a photo. More art means it looks like graphic art.
Then, there are color options, if you want to add more of a general shade. Hue runs through a slider bar rainbow, casting a filter over the entire image.
After that, there’s Saturation (low means a black and white image, high means a very very brightly saturated image), Brightness (to lighten or darken the image), and Sharpness (blurry or super crisp).
Happy (adjusting squint of eyes and the creases at the corners of the mouth) and Angry (adjusting the furrow of brows and the set of the mouth) come next.
Then, Blue Eyes and Earrings, both of which would be tricky to get without these little options.
Eyes Open and Mouth Open come in handy when making a character happy. The happy adjustment usually closes the eyes and doesn’t always look right with a closed mouth. So, anytime I make a character happy, I adjust these two things as well, as evidenced here:

Then, there are options for hair color (Black, Blonde, or Brown) as well as Makeup, Glasses, Facial Hair, and Hat.
Below all of these, there’s an option to Add Genes, and let me tell you, those genes get wild. There are options for Orcs, Vampires, Forest Creatures, Cyber Noir, Sad, Gene Combo Sixty Nine, and something called “Brown to Fish,” as well as many others to play with.
But Jake is a human, so I’m not adding those to him.
Now, I adjusted his gender a tad to the right to get a bit more ruggedness, and his age down just a bit to get him closer to 26. Then, I added just a touch of facial hair, and I got this:

And I have to say, I’m pretty happy with how he turned out.

Caution with the Genes.
My two biggest pieces of advice to you are to be cautious and save often.
Move slowly when making adjustments on those genes. A little change can have a big impact on far more than just the single aspect you want to change. (For instance, Pitch and Yaw can completely change facial structure. Morphogen seems to have some difficulty with the perspective change.)
Hat and Earrings can have some… interesting effects, too. Hat at -2 does this:

Whereas Hat at 2 does this:

I don’t know why.
But as long as you save your product often, you can always come back to it if you want to start over, and each gene has a little refresh button by it to move it right back to 0 with a single click.
Oh, and beware of using this site on your phone. The slider bars are very sensitive and sometimes the different genes overlap on phones, resulting in unintentional changes.
Play around a bit.
This site has a learning curve, but it’s worth it in the end. You just have to give yourself permission to play around a bit. There will be some absolute monstrosities along the way, but that’s part of the fun sometimes.
And as long as you save often, you can always go back.
Find me on Goodreads.
Subscribe for sneak peeks and updates on my upcoming books (and get a free short story).
Check out my gritty, literary sci-fi and fantasy books here.
Want to help fund this blog and my writing efforts? You can support me directly here.