There’s this piece of advice that floats around writing circles that I absolutely hate. “Write what you know.”
I hate it for a couple reasons.
For starters, it’s become a means of gatekeeping. People use it to tell people they shouldn’t write a character of a gender or sexual orientation or race that’s different from their own. People also use it to tell others not to write characters in a situation that they’ve never experienced, like mental illness or extreme poverty.
And I hate that.
It completely negates the fact that we can learn. We can do research and broaden our horizons and grow as human beings.
We can come to understand other people in ways we didn’t before, and books are a wonderful way to do that.
“Write what you know” also limits what a person can write in other ways.
If authors only ever wrote what they know, every character would be a bookworm of some sort, and the fantasy/sci-fi genres wouldn’t exist. Magic isn’t real, and aliens aren’t officially recognized as real, so no one “knows” them to write them. Same with zombies or super-advanced technology.
And then there are the hobbies and things that people could never write without first diving into them.
So, instead of, “Write what you know,” I’m an advocate for research.
For example, if a character is a mechanic, learn a little bit about cars.
It won’t hurt you to know how to change your oil. (And knowing how doesn’t mean you can’t just pay someone else to do it.) It won’t hurt you to know that if a pully on the motor is bent, it might shred the serpentine belt (over time), which fucks a lot of shit up (goodbye power steering and engine cooling, for instance).
It also doesn’t hurt to know that Stop Leak is a thing, but most mechanics would recommend replacing the head or the head gasket rather than using it because it’s more of a band-aid than an actual fix, and could leave you stranded on the side of the road later on with all the fluids draining out of the engine. (Personal experience from my days as a broke ass college student taught me that one.)
If a character is an archer, you probably need to research archery.
It won’t hurt you to know that the extended arm will ache more than the arm drawing the string if you hold for too long (same tension because of the whole equal and opposite reaction thing, plus the weight of holding the arm and bow out away from the body), or that double jointed elbows might mean the string clips your elbow on release if your elbow is at full lock.
If a character suffers from depression, you probably need to know about intrusive thoughts and the complete and total lack of energy that sometimes holds a person in an existential crisis on the couch, stopping them from doing things they know full well that they need to do while simultaneously making them feel like shit for not doing those things.
If a character is a lesbian, you should probably do some research and learn that not all lesbians have a high sex drive or fit the typical “butch” stereotype. And they aren’t lesbians just because they haven’t met the right man.
My point is, these are things you should learn, things you should research.
Not things that should stop you from writing a character the way they’re supposed to be written.
This doesn’t mean you have to be an expert in every hobby your character undertakes (unless the character is supposed to be an expert and that knowledge affects the story). At least get the basics, though.
Do your characters (and real people) justice.
Research appropriately.
Subscribe for sneak peeks and updates on my upcoming books (and get a free short story).
Check out my gritty, literary sci-fi and fantasy books here.
So many readers love a good map to accompany their books, and for good reason. It’s a nice little extra bit of world building and helps to orient a person in a fictional world.
But unless you’re extremely familiar with graphic design, making the map yourself could prove difficult. Hiring the work out could prove expensive (as it should, graphic design work require time, effort, and a lot of practice).
But there are a couple alternatives that allow you to make your own map and (for a reasonable price) use them for commercial purposes, i.e. in a book. If you’re making a map for a non-commercial purpose (a personal Dungeons & Dragons campaign with friends, perhaps), I’m not sure the same fees would apply.
So, without further adieu, the map making resources you came here for.
This lovely website lets you build a custom map from the ground up. Well, from the sea bed up, because at the start, it’s all water.
You start out by selecting the overall feel you want the map to have, be it parchment or watercolor. You also choose whether it’s a battle map, regional map, or world map.
Then, you start shaping continents with a tool that raises land up out of the water. You can adjust the edges of that tool to be smooth or rough (for more realistic coastlines). You can sink areas back down to make lakes. There’s a separate tool for drawing paths, which could be used for thin snaking rivers or trade routes or whatever you want.
With the geography roughed out, you can choose from a bunch of “Stamp” options. These are used for the compass and scale, banners and bridges, towns and buildings, mountains and trees, even mythical creatures.
There’s a pretty wide assortment, so you’ll just have to play around and find the ones you like the best. It automatically defaults to the ones that match the style you chose for your map, but you can change the filters and select from any stamps, regardless of style.
There’s also an option to add text (with the option to curve it to fit banners) and brushes for different textures and colors. It has some trial and error involved for sure, but once you get the hang of it, it’s pretty fun.
And you can come out the other side with some amazing maps.
The cost to use the maps for commercial use?
$25 a year or $5 a month.
Here’s the official terms of service if you want to read them. Don’t worry, it’s only 8 pages or reasonably sized text.
As you may have guessed from the word “generator” in the link above, this one makes a complete, randomized world for you. Of course, you can change it, altering altitudes and coastlines to fit what you have in mind for your world if you don’t like a few parts of the random map. Or you can generate a new one altogether.
One of the really cool things about this one is that it’s really in depth. It populates the world for you, throwing in a variety of cultures (derived from real world influences as well as existing fictional races), countries, political factions, religions, trade routes, etc.
It accounts for precipitation based on topography, temperature based on a country’s position on the globe. It even has a layer option to show military forces.
And if you click on the cities, it pulls up a small map of the city streets.
All the various layers and options are available for you to tweak if you click the little bitty triangle in the top left of the screen.
Now, since I’ve only discovered this map generator recently, I’m by no means an expert in what can be done with it. But I can see its potential, and there are a multitude of tutorials on YouTube to help you get the most out of it.
Cost for commercial licensing?
Judging by the reply the creator left for a Redditor, all they ask is that you mention that you used their generator.
Which is astonishing and unbelievably cool of them.
The license itself is linked in that post, but if you’d rather skip straight to the license (which says free) here it is. They even made that simple. It’s less than one page.
Subscribe for sneak peeks and updates on my upcoming books (and get a free short story).
Check out my gritty, literary sci-fi and fantasy books here.
Getting our books just right is hard sometimes. But there’s a really easy way to make it look more professional and potentially drive readers to your next book (or to review the book they’ve just read).
The secret?
It’s all those extra pages at the beginning and end of the book. The front and back matter.
Here’s a little list of things to include (or consider including) to take your book up a notch.
Front Matter
Pretty Title Page This one isn’t necessary, but it does give the book a little something extra. In a few of my own books, I’ve put a page with the cover art but in black and white (printing in color drives the price way up), the typography off the cover, or a completely different design specially made for that page.
*Don’t include in ebooks. Different screen sizes from one ereader or app to another could cut the image off and make it look bad.
Regular Title Page This one should be in there, whether you have a pretty title page or not. It’s easy to read and provides a good place for signatures.
Copyright Page An absolute must. Include the copyright claimant, the copyright year, the ISBN, and the statement that the rights are reserved. If you want to, you can include the copyright registration number. If you’re not sure how to word all that, you can look at the books you read to see how they did it and take cues from their copyright pages.
*If you’re in a country that requires it, don’t forget to register your copyright.
Dedication Optional, but nice. There are a lot of ways to format these. Sometimes a simple, “To Mom,” works, but you can get elaborate if you want to. There have been a lot of these floating around the internet that are more like… warnings for loved ones that shouldn’t read it.
Table of Contents These aren’t 100% necessary, but a lot of readers really appreciate them. And as long as you have all your chapters/section headings marked as Headings in Word, it’ll format the table for you when you insert it. In the ebook format, you might want to set the table of contents up with hyperlinks to make things even easier for your readers.
Map Not a necessity, but again, a lot of readers really like these, especially in high/epic fantasy.
Front or Back Matter
Other Books by This Author I’ve seen these at the front of the book and at the back of the book. Either way is fine. If it’s an ebook (which means you can include hyperlinks) maybe put it at the back with something along the lines of: On to your next great read with… If you’re publishing your debut novel, don’t stress about not being able to include this. Self-publishing means you can always update the files later to include this page. If you have multiple books out, please please please include this! It’s free marketing for your other books directed at someone who already said yes to one of your books. Not including this is a wasted opportunity.
Back Matter
Thank You Page Thank your reader. They just spent a ton of time in your world. They gave you and your characters and your creation their energy and focus. Thanking them gives the book a slightly more personal feel. This page is also a great place to ask that they leave a review on Goodreads or Amazon.
Acknowledgements This one isn’t a necessity, but it could be a nice little finishing touch. Whether you had a co-writer (who might have their own acknowledgements page to include), a developmental editor that really helped you from the start, supportive friends and family, a team of beta readers that went above and beyond, patreon supporters, or a group of writer friends that kept you going, this is a great place to mention them.
Afterword Again, not necessary, but sometimes good. This is just a place to review some things that took place in the book, maybe compare themes to the real world, explain why something is the way it is, or address your reason for writing the book in the first place. Two of my books include an afterword (though in one it’s called A Letter from the Author). One focuses on sexual abuse, its after effects, and the needs for better treatment of victims and stricter punishment for offenders. The other talks about suicide and includes the number for the suicide helpline. One that I’m currently writing will have an afterword that includes information about Obsessive Compulsive Disorder and memory deficits/time misperception in survivors of childhood sexual abuse. These are pertinent to the books they’re placed within. Yours don’t have to be so heavy.
About the Author You definitely need one of these. Tell a little something about yourself, list awards if you’ve gotten any, and provide a website or social media platform for readers to follow you. Don’t go overboard with links though. Just a dab’ll do ya. (So, no more than three or four.) And these links should not be four pages long with random letters and symbols and numbers. Provide clean links or even simply usernames for certain platforms.
Teaser of the next book in the series If this is a series, you can include a small excerpt of the next book to try and lead your reader through. The first chapter is usually a good amount.
Pick and choose which of these are best for you and your book. Have fun with it, and good luck with your publishing journey!
Subscribe for sneak peeks and updates on my upcoming books (and get a free short story).
Check out my gritty, literary sci-fi and fantasy books here.
Publishing is like walking through a minefield. Some of the mines hurt. Some of them are more like a jack-in-the-box. Others actually hand out rewards in a non-explosive way.
But which of those categories does Kindle Unlimited fall into?
For those who don’t know, Kindle Unlimited is something you can only enroll your ebook in (through Kindle Select) if you publish through KDP and only KDP. Paperback and hardback can be published through other publishers, but the ebook has to be specifically through KDP and enrolled in Kindle Select.
Now, that does eliminate some potential sales and readers on Nook, Kobo, iBooks, Google Play Books, etc. But 72% of people reading ebooks do so on a Kindle or Kindle app.
Putting your book in Kindle Unlimited does alienate 28% of ebook readers, but it also opens up a whole new market for you.
You see, if someone subscribes to Kindle Unlimited, they can read as many books from the program as they want. They pay the monthly subscription fee, but nothing else.
So, programs like this are where you tend to get your reading “whales,” the truly big fish, the people reading so much that not having a monthly subscription just doesn’t make sense financially. And voracious readers are what writers want to find.
Now, how do you get paid if your book is in Kindle Unlimited?
KDP pays you per page read (they call it KENP). So, if a person reads your entire book, you get paid for all those pages. If they read fifteen pages and never come back to it, you still get paid for those fifteen pages instead of forfeiting the royalty if they had returned a regular ebook or just read the sample and never bought the book.
So, there are some positives there.
The amount you get per page read varies from month to month. KDP does some calculations, figuring up what the total income of the Kindle Unlimited subscriptions were worldwide and breaking it down across the total number of pages read. And they give bonuses to the people who whose books were read the most.
What does that mean for you?
Typically, the amount paid per page is pretty low. I’m talking fractions of pennies per page. But it adds up over the course of a book or two or a full blown series or your entire backlist.
Kindle Unlimited is really good for people with a lot of books out or with a big series and good readthrough rates. Because then, when a reader finds one of your books and loves it, they can immediately read through all of them. No further purchases on their end, but more royalties for you.
Enrolling in Kindle Select also means that you can run price promotions on KDP, lowering your price without sacrificing your royalty percentage or even making it free for a certain number of days per quarter.
And since Amazon now owns Goodreads (yep, they sure do), you can still run a Goodreads giveaway while enrolled in Kindle Select. I emailed them to make sure.
But you can’t sell it anywhere else.
No Nook ebooks. No Kobo. No iBooks.
Not even on your own website.
As long as it’s enrolled, your ebook can only be available for Kindles.
So, though there are a lot of pros to enrolling in Kindle Select to get your book into Kindle Unlimited, there is a very real drawback. You just have to decide whether you want your ebooks wide or strictly through KDP.
But rest easy. If you decide you don’t want to be in Kindle Select, you can unenroll and go wide. Or you can release your ebook with wide distribution through another self-publisher and later on, unpublish it with the other publisher to enroll it in Kindle Select.
If that’s your plan, I recommend that you publish the ebook through KDP and the other publisher simultaneously, that way the Amazon listing is unaffected when you unpublish with the other publisher. That way, you don’t lose your reviews.
Subscribe for sneak peeks and updates on my upcoming books (and get a free short story).
Check out my gritty, literary sci-fi and fantasy books here.
I’ve been doing this blog for three years now. There have been some highs and lows, some moments where I really felt like it was helping people, and some moments where I doubted whether anyone even reads these things I spend so much time on.
Which could be said of any part of any creative field, honestly.
But after three years of weekly posts, it feels like I might be reaching a breaking point for this blog.
My mind comes up with characters and stories and worlds without even trying, handling creative writing with relative ease. But when it comes to trying to teach or share skills, my well often runs dry.
Partly because I don’t feel like I know enough to actually teach or share any skills. Partly because technical writing (like blogging) just isn’t my thing.
And partly because I’ve already done somewhere around 150 blogs, and to be honest, I’m not sure what else to cover.
Every week, I try to put notes into my phone about potential blog topics, complete with a phrase or two to round out a couple of those ideas. Sometimes that happens. Sometimes I just can’t think of anything.
Then, when Sunday night rolls around and it’s time to sit and write my blog… I sit staring at the screen, wracking my brain for anything to write.
And it’s stressful.
So unbelievably stressful that, every week, I consider just… not doing it anymore.
But I have this problem with giving up on things. Namely, that I don’t. I hold on, forcing myself to keep going, to keep doing things because it’s expected, because it’s a habit, because it’s what I’m supposed to do.
Even if it’s genuinely stressful.
Even if I’m not sure it’s benefiting anyone else.
Even if I know it’s not benefiting me.
And while I’m proud that I’ve managed to do a blog every week without missing a single time (though the holiday and extra time off threw me off and nearly made me miss this one), I’m not sure I’m going to keep it going as I have so far.
I’ve considered making it a weekly update on my writing, as that’s what it was to start with. It was a means to keep myself accountable with my writing and editing, a way to let people know what I’m doing.
But I don’t really need the accountability aspect. I genuinely love creative writing and editing, and do those things regularly.
Plus, I have my social media pages/profiles for sharing tidbits, with exclusive stuff sent out in my newsletter. (You should sign up, btw. You’ll get a free short story, updates on my progress, and exclusive sneak peeks/excerpts.)
So, maybe I’ll cut my blog back to every other week instead of weekly for now, just to ease the strain of trying to make myself feel like an expert in four subjects every month.
My newsletter will still be weekly. That’s not really stressful as it’s more of a place for me to show you how things are going. Plus, I’m an expert on the worlds I create. Lol.
But for this blog, expect a change.
Who knows, I may restructure it entirely, transforming it into something new altogether and taking the pressure of being an expert out of the equation altogether. Because I’ll be honest, the content grind of long-term blogging is absolutely exhausting.
If that happens, that’ll be a long time coming though.
So, in the meantime, if there are any topics you want me to cover, don’t hesitate to ask. Send me a message, drop a comment on social media, whatever.
I’d say leave a comment here, but honestly, there are hundreds of bot comments backed up, waiting for me to delete them, that are just full of spammy links to other websites. Any real comment here would get buried rather than approved to be posted. Which… is another exhausting part of running a blog.
Anyway.
As I said above, if there’s a topic you want me to cover (tips on a certain aspect of writing/publishing, resources for a specific part of the journey, etc.), let me know on social media. I’m on Instagram, Facebook, Goodreads, and Twitter.
And don’t forget to sign-up for my newsletter to stay up to date on all of my writing projects (because there are a lot of them, and thus, there’s a lot that doesn’t get shown on social media).
And of course, if you want to check out my already published books, you can do so here.
Writing a book is a lengthy process, one that most people know very little about. There are so many facets to it that, unless you’re actively writing and publishing, you probably won’t even guess at.
But I want to lift that veil, at least a bit.
We don’t print our own books.
Publishing companies (or self-publishing companies) handle the printing and distributing for us.
The exception being that most authors keep copies of their books on hand for events or to sell signed copies on their websites. Those are still printed by the publishing company but have to be distributed by the author.
Writing the book is only a small part of the process.
There are so many steps after the first draft is written that it’s insane.
The first draft is followed by numerous rounds of editing, some more intensive than others, wherein we viciously rip out pieces of our precious work or come to terms with the fact that it maybe isn’t as polished and perfect as we thought while writing (or both, vacillating between the two emotions throughout the editing process).
Then, there’s the beta reader process and the fear of feedback, followed by even more revisions.
Then, the decision of traditional publishing vs indie publishing, each of which have their own unique challenges.
Traditional has months or years of querying agents or publishers, filled with rejections because most publishers only accept 1 or 2% of submissions. And of course, landing a deal means lawyers and contracts, followed by the revisions the publisher wants and a butt load of marketing.
Self-publishing means lining up professional edits and a cover artist and a formatter (though some authors do some parts of these things themselves), then all the research that goes into preparing the book’s metadata (keywords, categories, price, etc.). And of course, uploading to the self-publishing company.
And marketing.
Always marketing.
And all of that is why, for many, the writing is the easy part.
Each step in the path has its own unique obstacles. For me, writing is the fun part, the least stressful of any step, followed closely by editing (because that’s basically interactive reading).
But the tedium of formatting and the soul-destroying efforts of marketing are by far the worst.
We second guess ourselves at almost every step
Writers often fall prey to imposter syndrome. Creative fields lack the objective measurements that could tell us, with 100% certainty, that we’re doing things correctly.
Any rule can be broken. And I do mean any rule.
I once read a story that progressively abandoned more and more grammar rules as it went along, eventually forsaking even basic spelling and leaving out all punctuation.
But it ended up being the thing that made it a good story, good enough for me to remember it years later.
And if even the most basic rules can be completely and totally abandoned while still writing a good story (while other stories follow rules and turn out magnificently), that leaves a lot of room for doubt and self-loathing, two things we indulge in frequently.
Dialogue is important. I think we can all agree on that.
For me, it’s one of the first things that come to me when working on a story. The characters have conversations in my head, and the scene develops around them.
It’s one of my favorite parts of writing, honestly.
So, today, I want to share some tips to help you get your dialogue down in a way that’s easy to read and feels natural.
Said is not dead.
Said/says are viable dialogue tags, but a lot of writers seem to think it’ll make their writing boring somehow to use “said” instead of “whispered” or “spat” or “hissed” or any of the other million dialogue tag options.
But there’s a reason said/says is kinda the standard.
It’s neutral.
Aside from the fact that it’s just the basic action of speaking, it’s virtually invisible. The word said is a background word, something most readers don’t notice unless the book is just dialogue heavy and there are no other tags attached to dialogue.
Things like “crooned” or “shouted” are more active. They change the way the dialogue is interpreted. The reader has to actually engage with that word to interpret the things your characters say appropriately.
And though it may be an infinitesimal difference in reading time, there is a bit of a difference. Refusing to use “said” means that every time a character speaks, there’s that little split second delay of applying the manner of speech to the words spoken. Not only does that add up, it gets annoying.
So, said/says should probably be your primary dialogue tag. Others should be sprinkled over the manuscript.
Certain grammatical rules don’t apply to speech.
People do not speak with proper grammar. We say “towards” instead of “toward.” We use contractions, saying “can’t” instead of “can not” most of the time.
This should be reflected in your characters’ speech patterns unless you’re writing a character who’s unbelievably proper.
Or if you’re writing a historical regency romance.
Go easy with the slang.
Just because we don’t speak properly doesn’t mean every other word should be a slang term. Slang happens and should be a part of your dialogue (though it should be customized to the world/characters).
But it shouldn’t sound like a parody where someone is trying to be cool and failing miserably.
Dialects/Accents can be distracting when typed out.
It’s unbelievably tempting to type things up according to a character’s accent or dialect. But there is a risk associated with that.
It can be distracting or difficult for people who don’t use that dialect to understand.
But they might also be the thing that really defines the character (if done well).
As with most things in writing, it’s all a matter of doing it well. Every rule can be broken (if you do it well). Every trope can be subverted or embodied with great results (if done well).
And accents and dialects are no exception.
Get it right, and it might be the thing that makes a character relatable or endearing or swoon-worthy (depending on what you’re writing).
New paragraph for a new speaker.
For the love of everything that’s still good in this world, start a new paragraph when you switch speakers. It gets so hard to keep track of things when there are multiple speakers in one paragraph.
And it’s such a simple fix.
Just hit enter.
Personally, this is something that will make me stop reading a book. If I can’t tell who’s speaking, I can’t keep track of the characters’ motives, fears, or relationships. And the characters are the main reason I read.
I’m thinking of trying something, and I wanted to share it in case it might help someone else out there.
I’m going to call them Garbage Days.
Basically, I want to sit down and write literally anything. A short story, something new, an alternate ending, stream of consciousness, a random character description that’s been rattling around in my head…
Anything.
Things just feel so cluttered sometimes, and I’m always paranoid that I’ll forget the details. It gets a bit distracting at times.
So I think having a Garbage Day every now and then might help.
I guess if you don’t want it to sound so negative, you could call it Spring Cleaning or some other prettier name, but I tend toward blunt and sarcastic, so Garbage Day works for me. Lol.
I’m not sure how often to do this or when I’ll actually be able to start, but I’m kinda excited to see what the hell will come out of it.
Will you be adopting Garbage Days as a writing tactic?
I often rage about overly-detailed books. I don’t like being bogged down with unnecessary information.
But you can’t strip it all away either.
I mean, you could, but the result may not pull your readers in.
It’s a fine balance, and the line lies somewhere different for everyone depending on style and genre. But no matter what, you need some scene descriptions. Your characters probably don’t exist in a void. They interact with things around them, and those things interact with them.
If they’re outside, the wind might tousle their hair.
If they’re in a kitchen, they might lean against the counter while talking.
These little things that might feel superfluous are important because they connect the character, and thus the reader, to their world. It means that, instead of floating in a dark nothingness, the characters have mass. They take up space within a world, even if it’s a made up one.
That gives them weight. It makes them more realistic and thus, more relatable.
So, while you don’t want your reader to feel like you’re suffocating them under red velvet curtains layered over lace sheers that pool on the white marble floor whose mineral veins streak and sparkle from one ornately wrought wall to another…
You do need some detail to make sure the character feels grounded, in a literal way.
But how do you do it without overwhelming your reader?
Broad strokes first.
Maybe their eyes drift over the forest before them, rising to the mountain range behind it. Or maybe they’re looting in the apocalypse, and enter a trendy office space with colorful furniture.
These general notions give the reader an idea of what’s around the character without slowing things down or becoming overwhelming.
Sprinkle in some details.
Don’t info-dump. Instead, add a detail every so often, punctuating dialogue or movement with it.
When I enter a room, I don’t often stop in place to take in every detail down to the fabric a certain item of clothing draped over a chair is made of. Most people don’t.
These things are noticed slowly over time, if at all.
Show it through the lens of your character.
Instead of describing the room in the aforementioned (and dreaded) info-dump and then saying that your character is walking through it, maybe say that their footsteps echo in the cavernous space, boots thudding against the stone floor. That gets the action and some description taken care of in one sentence without bogging anything down.
Or instead of detailing worn down furniture and then describing your character’s anxiety, show them worrying ceaselessly at a loose string on the threadbare couch.
Showing what the character interacts with directly really helps to anchor them.
Artbreeder is one of those amazing websites that has the potential for truly wonderful things (portraits, landscapes, anime, buildings, paintings, etc.). Or… images that seethe with existential horror.
And depending on your needs, either of those could be perfect.
The latter seems easier to make by accident, so today, I’ll be covering the nicer looking images.
So, let’s start at the beginning.
Artbreeder is basically a place for people to smash pictures together, edit the individual components (aka genes), or use their “Children” feature to get similar pictures, all with a few clicks.
Copyrights for the images created on the site belong to the individual user, since the user created those images through a series of personal creative choices, though they’re also public domain. (Here’s the official terms and services. Don’t worry, it’s surprisingly concise at a mere 4 pages with reasonably-sized text.)
I use it primarily for headshots for my book characters (which is what I’ll be doing in this little tutorial of sorts), though the basics apply across the site.
As you can see above, the things you see on this site will run the gamut. That’s just the main screen when I visited, and it will likely be different when you visit.
Now, up at the top of that image, there are two choices. Images and Genes. You can click either one, or at the top right of the screen (not in the picture) there are the options to Create or Browse.
I usually sift through images to find a hairstyle close to what I want. (There are more options for tweaking facial features than for hairstyles.)
Today, I’ll be making Jake, one of the characters from my NaNoWriMo Project (The Monsters that H(a)unt Us), as I walk you through this.
So, go ahead and pick a character and find a picture that gets close, even if only in the hairstyle. Or if you’d like to just wing it for this first experiment, pick a random image that you like and maybe this will inspire a story about the person you create.
Jake tends to sweep his sandy hair to one side, so here’s the image I’m starting with:
Below are options that other people have made from that image. Off to the right are the options Edit-Genes, Children, or Cross-Breed. I’m going to start off with the Children option, as shown in the picture.
The site’s Morphogen algorithm makes new randomized versions of that image for you, and gives you an automatic separation from the original image. You have a little bar below the three auto-generated options to select how similar you want the children to be to the parent.
But if you like one of the kids, you should click it. Once you hit the little refresh button (right below the bar for similar/different), the kids that were on screen disappear. If you click them, they appear in your profile under images you created.
So, I chose my favorite child, as seen here:
But he still wasn’t quite right for dear old Jake. So, I clicked on Crossbreed, clicked search, and typed in blond (I left the ‘e’ off because he’s a he, and the ‘e’ is typically for women, and I wasn’t sure if that would matter).
The guy on the far right is the one I decided to cross breed with.
With this lovely picture to smash together with the favorite child, I actually got something I like right off the bat (the far left). But there are slider-bars beneath the two images on the right to choose which image you want the new one to take after (face structure and art style).
Since I’m pretty happy with my turnout, I’m going to move to Edit-Genes, but you feel free to move those little slider bars to your heart’s content. Just be sure to click Save (below the slider bars) if you like the image on the left (so it doesn’t disappear). Once saved, it’ll show up at the bottom, as well as on your profile under “Created” so you can come back to it later.
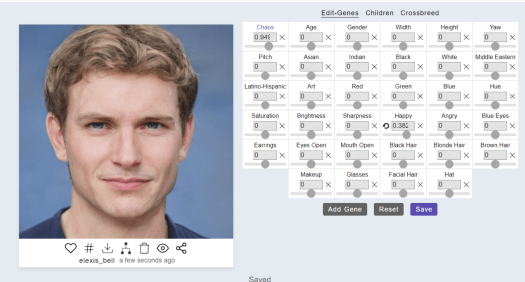
Now, I’ve saved and clicked my new image, and I’m ready to edit some genes. This is where the finesse comes in (or the existential horror).
As you can see, there are a lot of options.
Gene Explanations:
I haven’t quite figured out the Chaos gene, which makes sense. Chaos is, well, chaos. It doesn’t make much sense to me.
But other genes available to edit are a little more intuitive. Age and Gender do exactly as they say. Width makes for a wider or narrower face, where Height lengthens or shortens their head. Yaw adjust whether they’re turned one direction or the other. Pitch is whether they’re tipping their head back or down.
Then, there are the various race options. These adjust bone structure, hair color/type, skin tone, eye color, etc.
Art affects the realism of the image. Less means it looks more like a photo. More art means it looks like graphic art.
Then, there are color options, if you want to add more of a general shade. Hue runs through a slider bar rainbow, casting a filter over the entire image.
After that, there’s Saturation (low means a black and white image, high means a very very brightly saturated image), Brightness (to lighten or darken the image), and Sharpness (blurry or super crisp).
Happy (adjusting squint of eyes and the creases at the corners of the mouth) and Angry (adjusting the furrow of brows and the set of the mouth) come next.
Then, Blue Eyes and Earrings, both of which would be tricky to get without these little options.
Eyes Open and Mouth Open come in handy when making a character happy. The happy adjustment usually closes the eyes and doesn’t always look right with a closed mouth. So, anytime I make a character happy, I adjust these two things as well, as evidenced here:
Just Happy….Happy with eyes and mouth adjusted… Doesn’t that look more genuine?
Then, there are options for hair color (Black, Blonde, or Brown) as well as Makeup, Glasses, Facial Hair, and Hat.
Below all of these, there’s an option to Add Genes, and let me tell you, those genes get wild. There are options for Orcs, Vampires, Forest Creatures, Cyber Noir, Sad, Gene Combo Sixty Nine, and something called “Brown to Fish,” as well as many others to play with.
But Jake is a human, so I’m not adding those to him.
Now, I adjusted his gender a tad to the right to get a bit more ruggedness, and his age down just a bit to get him closer to 26. Then, I added just a touch of facial hair, and I got this:
Note the very minor adjustments. -0.07 (age), 0.2 (gender), and 0.116 (facial hair), as well as 0.172 to get his hair a little lighter.
And I have to say, I’m pretty happy with how he turned out.
Caution with the Genes.
My two biggest pieces of advice to you are to be cautious and save often.
Move slowly when making adjustments on those genes. A little change can have a big impact on far more than just the single aspect you want to change. (For instance, Pitch and Yaw can completely change facial structure. Morphogen seems to have some difficulty with the perspective change.)
Hat and Earrings can have some… interesting effects, too. Hat at -2 does this:
Whereas Hat at 2 does this:
I don’t know why.
But as long as you save your product often, you can always come back to it if you want to start over, and each gene has a little refresh button by it to move it right back to 0 with a single click.
Oh, and beware of using this site on your phone. The slider bars are very sensitive and sometimes the different genes overlap on phones, resulting in unintentional changes.
Play around a bit.
This site has a learning curve, but it’s worth it in the end. You just have to give yourself permission to play around a bit. There will be some absolute monstrosities along the way, but that’s part of the fun sometimes.
And as long as you save often, you can always go back.